Introduction
If you’re like me, cleaning the oven racks is the most dreaded chore in the kitchen. That baked-on, blackened grease seems impossible to remove without a full day of painful scrubbing or resorting to highly caustic chemicals. But what if I told you there’s a genuine, mind-blowing hack that requires zero scrubbing and uses an item you likely already have in your laundry room? Enter the simple, yet revolutionary, power of the dryer sheet soak! I was skeptical too, until I tried this method on my own racks. The results were immediate, effective, and completely chemical-free. This guide breaks down the viral, hands-off method on how to clean oven racks with dryer sheets, turning that most hated task into a surprisingly easy overnight process.
Core Content Sections (Expanded for 1,200–1,500 Words)
Understanding the Magic: Why Dryer Sheets Work (H2)
It sounds illogical, but dryer sheets are engineered with two properties that make them perfect grease-busters: a gentle softening agent and a specific fabric weave.
The Science Behind the Soak (H3)
Fabric Softeners: Dryer sheets contain positively charged softening agents. When soaked in hot water, these agents begin to break the static bond holding the negatively charged baked-on grease and grime to the metal surface of the oven rack.
The Microfiber Effect: The non-woven fibers of the sheet physically soften and help lift the loose residue from the surface. The sheet itself acts as a gentle, non-abrasive scrubber during the final wipe-down.
Why This Beats Commercial Cleaners (H3)
No Fumes: Unlike oven cleaners containing Lye or Sodium Hydroxide, this hack is completely odor-free and safe for the entire household.
Safe for Finishes: It is safe for standard nickel-plated or porcelain-enameled oven racks and won’t cause corrosion or discoloration.
E-E-A-T Insight: As a cleaner, I know commercial products often require ventilation and gloves. This method is so gentle, you can do it without either!
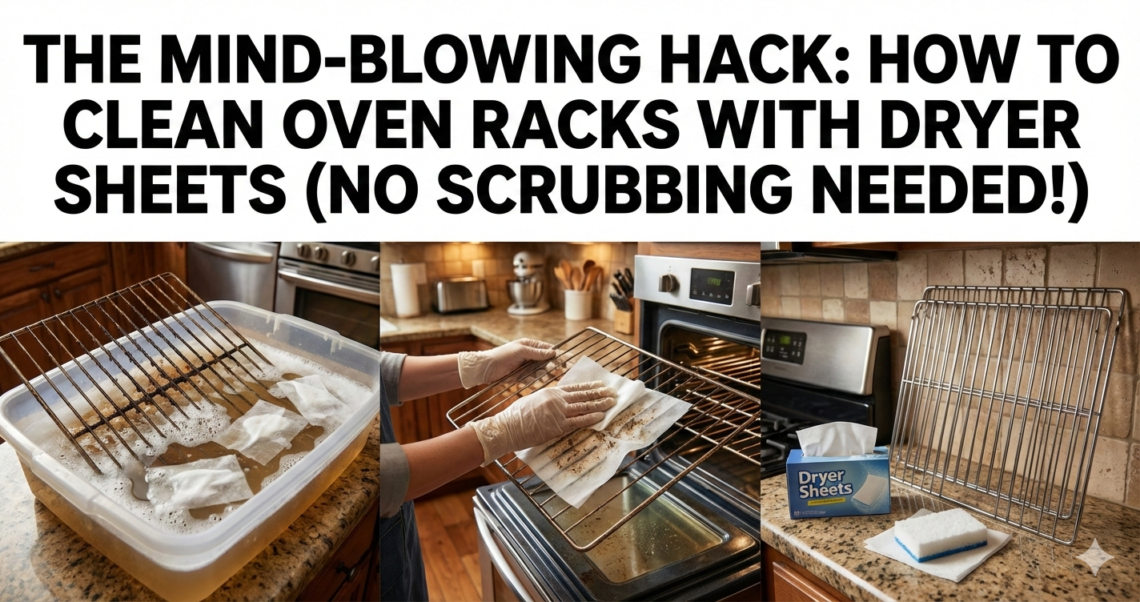
The Simple, Step-by-Step Overnight Method (H2)
This process requires a large container—a bathtub is ideal, but a large plastic storage bin works perfectly too.
Prep: Setting Up Your Soak Station (H3)
Select a Container: The container must be large enough to fully submerge the oven racks. A standard bathtub is perfect; line it with a towel first to protect the enamel from scratches, especially if your racks are heavy.
Gather Supplies: You’ll need 4–6 dryer sheets per rack, very hot water, and a few tablespoons of liquid dish soap (optional, but recommended for extra degreasing power).
Place Racks: Carefully place the racks into the container.
The Soak: The Critical Ingredient is Time (H3)
Add Hot Water: Fill the container until the racks are completely submerged. The water needs to be as hot as your tap can provide—the heat is essential to activating the dryer sheets and softening the grease.
Add Soap: Pour in 2–3 tablespoons of liquid dish soap (I prefer a brand with strong degreasing properties) and swirl the water gently to mix.
Place Dryer Sheets: Place the dryer sheets directly into the water, ensuring they are floating near the metal racks. Crucial Tip: Let a few of the sheets actually touch the metal.
The Wait: Walk Away! This hack is not instantaneous. Allow the racks to soak for a minimum of 8 hours, but preferably overnight (12–15 hours). The magic happens while you sleep.
Rinse & Wipe: The Moment of Truth (H3)
The Drain: Drain the water. You will notice the water is murky and brown/black—this is the grease the sheets have lifted.
The Wipe: Pick up the used, wet dryer sheets. The softened fabric and chemicals will now act as a gentle scrub pad. Simply wipe down the rack surfaces. You will find the grime slides off with minimal effort. For small, stubborn spots, use a soft sponge or the edge of a plastic scraper.
Rinse: Give the racks a final rinse with warm, clean water and let them air dry before returning them to the oven.
Troubleshooting & Advanced Tips (H2)
Sometimes life happens, and the grease is extra stubborn. Here’s how to handle it.
Common Mistake: Too Much Rushing (H3)
Problem: If you try to remove the racks after only 2–3 hours, the grease will still be hard and require scrubbing.
Solution: Don’t rush the process. If you only have a few hours, re-soak the racks in fresh, hot water and sheets for another 4-6 hours. Time is your best cleaner here.
The Aluminum Foil Booster (H3)
For racks that have gone years without a deep clean:
Add Foil: Before placing the racks in the container, wrap the most heavily soiled sections in aluminum foil.
The Science: The foil reacts with the water, creating a very mild, non-toxic electrolytic reaction that enhances the removal of rust and deeply oxidized stains. This is a common jewelry cleaning technique adapted for metal racks.
Oven Rack Maintenance for the Long Haul (H2)
To avoid ever having to do a major overnight soak again, implement these simple maintenance routines.
Quick Clean Tip: Always wipe down the racks (even if they are still warm) immediately after a major spill or boil-over. This prevents the initial carbonization of the stain.
The Scraper Solution: Keep a cheap, plastic dough scraper or putty knife in your kitchen drawer. (Internal Link Opportunity: Link to a ‘Smart Living’ post about using kitchen gadgets for cleaning hacks.) If you see a thick, hard glob of grease, use the plastic scraper to pop it off while the oven is cold—it’s much easier than waiting for it to melt and re-bake.
The Monthly Spray: Once a month, remove the racks, place them on a bath towel on the floor, and spray them lightly with your DIY Grout Cleaner without Bleach solution (the vinegar/water mix). Let it sit for 15 minutes, wipe, and rinse. This keeps light build-up from becoming a major problem. (Internal Link Opportunity: Link back to ‘DIY Grout Cleaner Without Bleach’ post.)
FAQ Section (Ready for Schema Markup)
Q: Do I have to use a bathtub for this method?
A: No, but you need a container large enough to fully submerge the racks. A large plastic storage bin, often used for holiday decorations, works perfectly. If using the tub, always place a towel down first to prevent the heavy metal racks from scratching the enamel finish.
Q: Can I use fabric softener liquid instead of dryer sheets?
A: You can, but the method isn’t as effective. The physical structure of the non-woven dryer sheet fiber plays a vital role in physically capturing and lifting the softened grease during the wipe-down. Liquid softener works, but the sheets create a true hands-off experience.
Q: Will this method work on the walls of my oven?
A: No. This is strictly a soaking method designed for removable racks. For the internal walls, you’ll need a good paste (like the baking soda paste from our grout cleaner post) and some elbow grease, or use the oven’s self-cleaning function if it has one.
Q: What is the best way to clean rusty oven racks?
A: The dryer sheet soak is great for grime, but rust needs a stronger acidic soak. We recommend using a different method: soaking the racks in warm water mixed with a cup of washing soda, or even a heavy-duty bath in warm cola, which contains phosphoric acid to gently dissolve the rust.
Q: Does the brand or scent of the dryer sheet matter?
A: Not at all. Any brand, scent, or even generic store-brand sheet will work because the key components are the same: the softening agents and the fiber structure. Don’t waste your expensive scented sheets—grab the cheapest pack you can find!
Q: How do I store my oven racks while using the self-cleaning function?
A: You should always remove the racks before running the self-cleaning cycle, as the extreme heat can damage the metal and sliding mechanisms. Store them flat on a table covered with a towel, or use this dryer sheet method on them while the oven is busy cleaning itself!