2. Introduction (E-E-A-T & Engaging Hook)
A gallery wall is the ultimate expression of personality in a home. It transforms a blank wall into a dynamic focal point, telling a story through curated art, photographs, and mementos. But the process of creating one—the fear of drilling holes only to find the arrangement is off—stops many people dead in their tracks. It feels like an art, but I’m here to tell you it’s actually simple math and smart planning. As a professional installer and designer, I rely on specific layout templates and rules of spacing that guarantee a balanced, cohesive result every time. This guide breaks down the essential simple math and layout templates for a balanced gallery wall, ensuring you nail the placement, spacing, and anchoring, turning a daunting task into a satisfying, high-impact DIY project.
Step 1: The Simple Math of Placement and Eye Level
Before you select your frames, you must determine the optimal location and height for the entire arrangement.
The Center Point Rule
The Math: The center point of the entire gallery wall arrangement (or the center of a single large piece of art) should hang at 57 to 60 inches from the floor. This aligns with the average human eye level and is the standard rule for professional galleries.
Over Furniture: If the gallery wall hangs over a sofa, console table, or headboard, the bottom of the arrangement should be 6 to 8 inches above the top of the furniture. This connects the furniture visually without leaving a large, awkward gap.
E-E-A-T Insight: Ignoring the 57-inch rule is the most common mistake. Hanging art too high makes the ceiling feel low and the art look disconnected from the room’s furniture.
The Spacing Rule
The Math: The optimal spacing between frames should be consistent and narrow: 2 to 3 inches between all pieces.
Why it Works: Narrow, consistent spacing ensures the individual pieces read as one large, cohesive unit, rather than a collection of scattered frames.
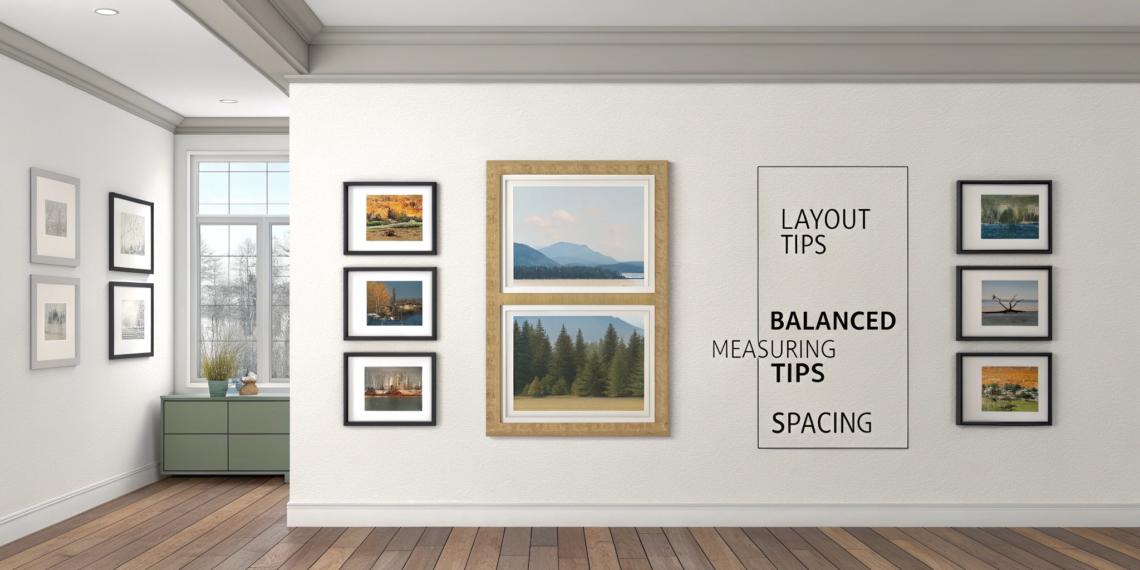
Step 2: Choosing Your Layout Template
The layout template provides the necessary structure for mixing different sizes and orientations.
Template 1: The Grid (Formal and Clean)
The Look: Frames are all the same size and shape (e.g., all 8x10s).
The Math: Use a level to ensure every piece is perfectly aligned horizontally and vertically, maintaining the exact 2-inch spacing between all pieces.
Best For: Creating a formal, symmetrical, high-end look, perfect for dining rooms or hallways.
Template 2: The Vertical Spine (Dynamic and Easy) (H3)
The Look: A mixed collection of sizes and shapes arranged around a strong, central vertical line.
The Math: Start by hanging your tallest or most dominant piece in the center, following the 57-inch rule. Align all subsequent pieces (smaller and larger) along the left and right edges of that central piece.
Best For: Bedrooms or living rooms where you want a visually organic, yet balanced, feel.
Template 3: The Center Anchor (Asymmetrical and Focal)
The Look: One large, focal piece (the anchor) surrounded by smaller, complementary pieces.
The Math: The center of the large anchor piece is hung at 57 inches. The surrounding smaller pieces radiate outward from it, maintaining the 2- to 3-inch gap. Pro Tip: Imagine drawing an invisible rectangle around the entire arrangement—it should look balanced within that rectangle.
Step 3: The Secret to Perfect Installation
The professional method for planning a gallery wall involves testing the layout before drilling a single hole.
The Kraft Paper Template Method
Trace: Lay out all your frames on the floor. Trace the outline of every single frame onto a large sheet of butcher paper or inexpensive kraft paper.
Mark: Mark the exact spot on the paper where the hanger/nail hole needs to go for each frame.
Cut and Arrange: Cut out all the paper templates. Use painters tape to tape them onto your wall, experimenting with the layout until the spacing and height are perfect.
Drill: Once the layout is confirmed, simply hammer the nail directly through the marked hole on the paper template into the wall.
Remove and Hang: Remove the paper template and hang the frame. Perfect alignment guaranteed!
Step 4: Cohesion and Curation
A balanced gallery wall uses more than just math; it uses coordinated elements to tie the collection together.
The Frame Strategy
Consistency is Key: Use a consistent color palette for your frames (e.g., all black, all white, or all natural wood). This unifies a disparate collection of photos and art styles.
The Mix: For an eclectic look, mix frame materials (e.g., black metal, light wood, and gold brass) but keep the matting color consistent (e.g., all white matting). This provides visual rest and professionalism.
Curating Content
The Color Filter: Even if the art styles are varied, ensure the color palette of the art itself is cohesive (e.g., all photos have a vintage sepia filter, or all paintings share a navy, beige, and gold color scheme).
Internal Link: [Anchor text: “the 60-30-10 rule” to the Home Decor post on color theory for palette inspiration].
Anchoring the Gallery Wall to Furniture
When hanging over a major piece of furniture, the arrangement must relate to the size of the piece below it.
The Math: The total width of your gallery wall arrangement (the invisible rectangle around the whole thing) should be approximately two-thirds to three-quarters the width of the furniture it hangs over (e.g., over a 90-inch sofa, the wall should be 60 to 67 inches wide).
The Connection: Hang the arrangement 6–8 inches above the back of the sofa to create a connected, harmonious visual unit.
4. FAQ Section (Ready for Schema Markup)
Q: Can I use different sized frames in a grid pattern?
A: A strict grid requires uniform frames for maximum impact. If you want a grid of different images, use a single, large frame size (e.g., 11×14) and simply change the size of the matting inside (e.g., a 4×6 photo in an 11×14 frame, or a 5×7 photo in an 11×14 frame).
Q: How high should I hang a gallery wall in a room with vaulted ceilings?
A: Even with high ceilings, the 57-to-60-inch rule for the center point still applies. Ignore the height of the vault itself and focus on the human eye level. If you hang the art too high, it will feel insignificant and disconnected from the rest of the room.
Q: Do all the frames need to be hung from one nail?
A: For small or medium frames, one central nail (or picture hanging hook) is fine. For heavy or very large frames (over 18 inches wide), use two D-ring hangers on the back and ensure your nails/screws hit the studs or use appropriate drywall anchors for stability.
Q: How do I incorporate three-dimensional objects (like small mirrors or baskets)?
A: Treat 3D objects as a single frame for spacing and layout purposes. Tape their outline onto the paper template. Their thickness adds wonderful visual interest, but they should be used sparingly to avoid making the wall look too busy.
Q: My walls are textured. What hanging method should I use?
A: Do not rely on adhesive hanging strips, as they often fail on textured walls. Use traditional picture hangers that require a nail. Ensure the nail is firmly tapped in and use the paper template method for perfect placement.
Q: Should I use a picture light?
A: A simple, hardwired or battery-operated picture light centered over the gallery wall arrangement adds a professional touch, draws attention to the art, and provides a beautiful focused glow in the evening.