2. Introduction (E-E-A-T & Engaging Hook)
In interior design, the ceiling is often called the “fifth wall,” yet most people treat it as an afterthought, defaulting to builder-grade flat white. That vast, horizontal surface is one of the most powerful tools for defining space, altering the perceived size of a room, and adding a serious dose of unexpected drama. Simply put, if you’re not painting your ceiling, you’re missing out on 20% of your room’s design potential! As a designer, I constantly use color on the fifth wall to solve layout problems and elevate the mood. This guide reveals the little-known design secrets on how to use ceiling paint to define zones, add depth, and create a sophisticated, custom look. Get ready to look up and transform your space!
Design Tactic 1: Using Color to Change Perceived Height
The most common way designers use ceiling paint is to visually trick the eye into changing the room’s proportions.
The Low Ceiling Fix: Going Dark
The Problem: Low ceilings (8 feet or less) feel oppressive when the ceiling is stark white, which makes the horizontal lines of the top of the wall very clear.
The Fix: Paint the ceiling a dark, saturated color (like charcoal, navy, or deep green). Crucially: Bring the ceiling color down onto the top 6 inches of the wall.
Why it Works: Dark colors recede. By blurring the line between the wall and the ceiling (the 6-inch overlap), the eye loses its clear horizontal boundary, creating an illusion of depth and loftiness. The ceiling “disappears” into shadow.
E-E-A-T Insight: This technique works beautifully in small spaces like powder rooms, where a dark, dramatic ceiling creates a jewel-box effect rather than a cramped feeling.
The High Ceiling Fix: Going Warm
The Problem: High or vaulted ceilings can make a room feel cold, impersonal, and empty.
The Fix: Paint the ceiling a warm, mid-tone color (like a soft beige, terracotta, or light gray).
Why it Works: Warm colors visually advance, bringing the ceiling down and making the room feel cozier, more intimate, and grounded. This is especially effective in large, open-concept living spaces.
Design Tactic 2: Defining Zones in Open Concepts
In an open-concept great room, ceiling paint is an excellent, non-committal way to separate functional areas.
The Ceiling Rug Technique
The Goal: Define the dining area from the living area without using walls.
The Method: Choose a color for the ceiling section directly above one zone (e.g., the dining table). The rest of the ceiling remains white.
Visual Impact: The colored rectangle on the ceiling acts like a visual “rug,” pulling the eye down and explicitly stating, “This is the dining room area.” It also beautifully frames a chandelier or light fixture in that zone.
Internal Link: [Anchor text: “maximizing open concept layouts” to a Home Decor post about furnishing open-plan spaces].
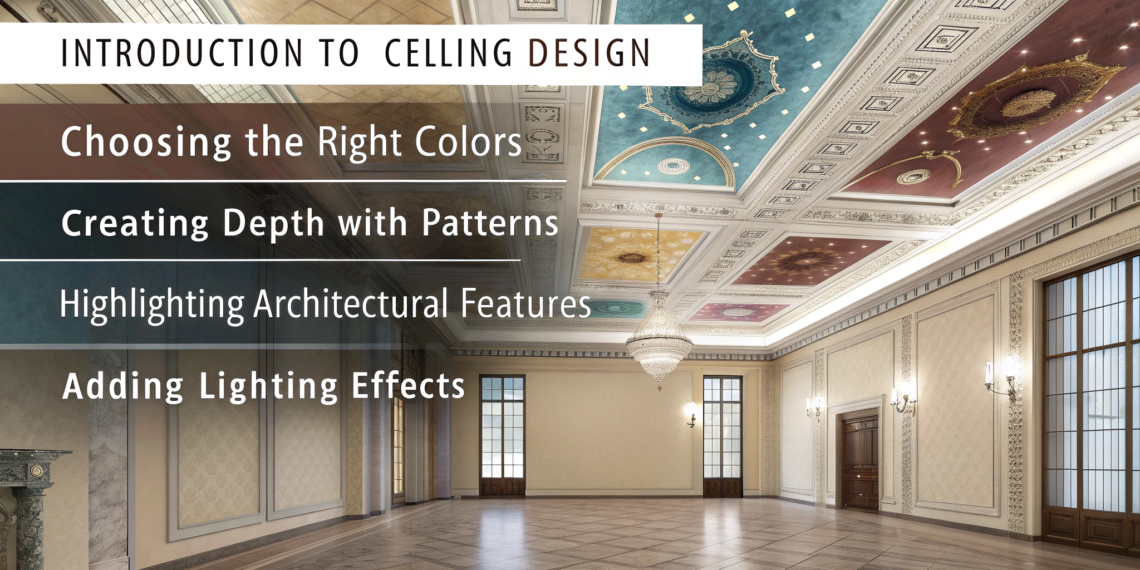
Enhancing Architectural Detail
Coffered Ceilings: If you have coffered or tray ceilings, paint the interior recess a deep, saturated color and leave the trim work bright white. This creates incredible dimension, depth, and contrast, instantly highlighting the architectural feature.
Internal Link: [Anchor text: “faux wainscoting techniques” to the DIY & Creative Projects post on DIY faux wainscoting for similar impact].
Design Tactic 3: Color Matching and Contrast
The relationship between the wall and ceiling colors dictates the final mood and style of the room.
The Monochromatic Wrap
The Method: Paint the walls, trim, and ceiling all the exact same color (using different sheens, though—flat on the ceiling, satin on the walls, semi-gloss on the trim).
The Result: This creates a seamless, modern, “wrapped” jewel-box effect that is extremely cozy and sophisticated. It works best in bedrooms, studies, or small dens.
The Reflective Sheen
The Sheen Choice: Ceiling paint is typically flat, which minimizes imperfections (like drywall bumps) but absorbs light.
The Designer Trick: Use an Eggshell or Satin sheen on the ceiling. The slight glossiness will reflect light around the room, making the space feel brighter and cleaner. Warning: Only use satin if your ceiling is perfectly smooth, as it highlights every flaw!
Practical Application and Technique
Painting the ceiling can be messy, but the results are worth the effort.
Essential Prep Work
Dust First: Ceilings accumulate a surprising amount of dust. Always wipe the ceiling down with a broom or a micro-fiber mop before painting.
The Cut-In: Use a high-quality angled brush to cut in the perimeter of the ceiling. If you are using the dark-ceiling-low-ceiling fix, this is where you bring your ceiling color 6 inches down the wall.
Roller Technique: Use a thick-nap roller (3/4 inch) to hold enough paint. Roll in large, overlapping strokes, working quickly. Avoid stopping and starting mid-section, as this will create texture differences.
E-E-A-T Authority: The Perfect White Ceiling
Designer Secret: Even if you choose white, don’t use stark white. Use a custom ceiling color that is 80% of your wall color. If your walls are a warm gray, mix 80% white with 20% of your wall color.
Why it Works: This subtle tint creates a harmonious glow between the wall and the ceiling, preventing the stark contrast of pure white that makes the ceiling feel like a disconnected lid.
4. FAQ Section (Ready for Schema Markup)
Q: Is it harder to paint a ceiling a dark color?
A: Yes, it often requires three thin coats, as the light reflects differently off a dark surface, making streaks more visible. Use a paint primer tinted to a light gray before applying your dark color to ensure even coverage.
Q: Will painting a ceiling a dark color make the room feel smaller?
A: Not necessarily. If you use the dark-color-on-the-top-6-inches-of-the-wall trick, it achieves the opposite: it makes the room feel larger because the boundary lines disappear, making the room’s dimensions ambiguous.
Q: Should I paint the ceiling trim (crown moulding) the same color as the ceiling?
A: If you want the ceiling to look taller and more dramatic, paint the crown moulding the same color as the wall or the same color as the ceiling. Painting the crown moulding stark white when the ceiling is colored creates a strong horizontal line that stops the eye and reduces the effect.
Q: What is the best sheen for a ceiling with imperfections?
A: Flat finish, hands down. Flat paint absorbs light and visually hides tiny bumps, cracks, and roller marks. Avoid anything with a sheen (like satin or semi-gloss) if your ceiling is old or uneven.
Q: Can I use two different colors on my ceiling?
A: Yes! This is a great way to create a striped pattern or a custom geometric design, especially in a child’s room or a quirky space. Just be sure to use high-quality painters tape and the sealing coat trick to prevent bleeding.
Q: Does ceiling paint contain specific mold-inhibitors?
A: Standard ceiling paint usually does not. If you are painting a bathroom or laundry room ceiling (high humidity), look specifically for a kitchen & bath paint or a paint labeled with mildewcide or anti-microbial properties.