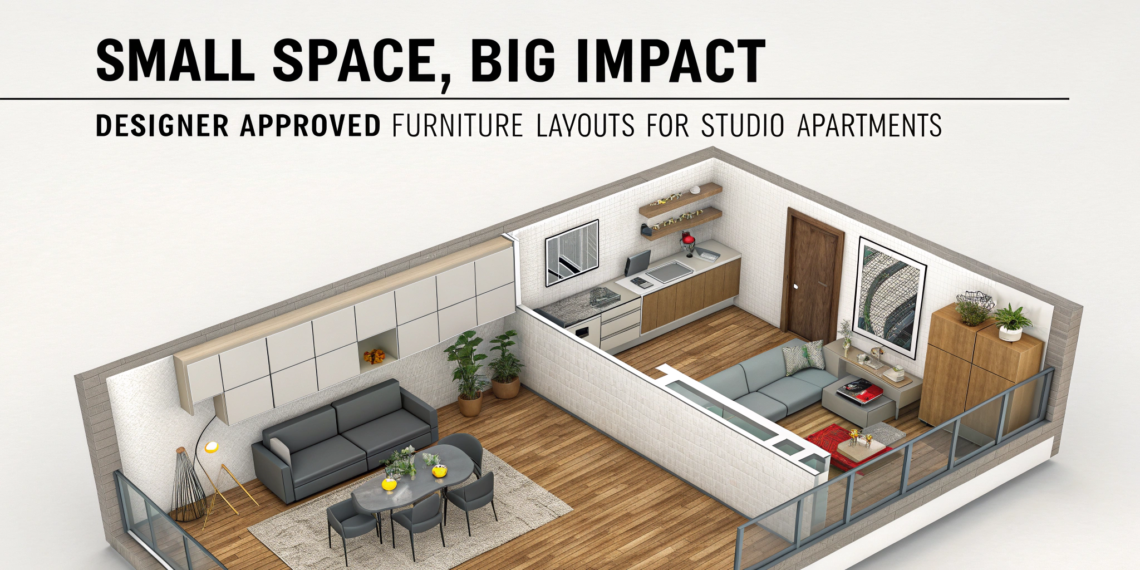
2. Introduction (E-E-A-T & Engaging Hook)
Studio apartment living presents the ultimate design puzzle: how do you fit a living room, a bedroom, and often an office into one single, contiguous space without it looking like a cluttered, oversized dorm room? The key isn’t buying smaller items; it’s about strategic zoning and furniture placement. When every square foot counts, designers rely on specific layout tricks to create the illusion of separate rooms and maximize the functionality of every item. As a specialist in small-space design, I believe a studio can feel just as expansive and organized as a multi-room apartment. This comprehensive guide breaks down the essential designer-approved furniture layouts for studio apartments, showing you exactly how to use furniture, rugs, and light to achieve a big-impact, organized home that truly works.
Step 1: Mapping the Zones
The most important step in a studio is defining distinct areas for living, sleeping, and working.
The Three Functional Zones
In a typical studio, you must establish three clear functional zones:
Living Zone: Sofa, TV, occasional chair. The social area.
Sleeping Zone: Bed and nightstand. The private, rest area.
Utility Zone: Kitchenette, bathroom access, dining table/desk. The active area.
Zoning with Rugs and Light
Rugs as Walls: Use area rugs to clearly demarcate the Living Zone and the Sleeping Zone. A large rug grounds the seating area, while a separate, smaller rug anchors the bed. The eye immediately understands these as separate rooms.
Lighting Layers: Use dedicated lighting fixtures for each zone. A floor lamp defines the Living Zone; a pendant light or wall sconce highlights the Dining/Work Zone; and a soft nightstand lamp belongs to the Sleeping Zone.
E-E-A-T Insight: Never center your main seating arrangement on the wall. Pull the sofa out at least 6 inches, even a foot, and float it in the center of the room to define the Living Zone as its own separate entity.
Step 2: Key Layouts for Separation
Using furniture as physical room dividers is the most effective way to separate the sleeping area from the rest of the apartment.
Layout 1: The Sofa Divider
The Method: Place the sofa so its back is facing the bed. The back of the sofa serves as a soft, low partition, separating the public (living) area from the private (sleeping) area.
The Benefit: It prevents the bed from being the first thing people see when they enter, prioritizing the social space.
Pro Tip: Place a narrow, low console table (sofa table) against the back of the sofa, creating a surface for books or lamps. This adds a visual boundary and prevents the sofa’s bare back from facing the bed. (Internal Link: Link to the ‘Console Table Styling’ post for ideas on decorating this table.)
Layout 2: The Bookshelf Partition
The Method: Use a wide, open-backed bookshelf as a full room divider. Position it perpendicular to the main wall, with one side facing the living area and the other facing the bed.
The Benefit: It provides massive, much-needed vertical storage and a nearly solid visual break.
E-E-A-T Authority: Avoid filling the shelves completely. Leave 40% of the shelves open to allow light to filter through, preventing the space from feeling completely cut off and maintaining an airy feel.
Layout 3: The Headboard Wall
The Method: If space allows, build a short, non-structural half-wall (often called a pony wall) with a height of 5 to 6 feet. The bed’s headboard rests against this wall.
The Benefit: This is the most definitive separation, allowing you to use the back of the wall as a dedicated spot for your TV or a compact desk.
Step 3: Multifunctional Furniture and Vertical Storage
Every piece of furniture in a studio must earn its place by serving at least two functions.
The Desk and Dining Swap
The Problem: Finding space for both a dining table and a desk.
The Solution: Use a gate-leg table or a drop-leaf table. These function as a small console or desk when folded, and extend out to a full dining table when entertaining. Position this table in the Utility Zone, near the kitchenette.
Smart Storage ChoiceS
Lift-Top Coffee Table: Choose a coffee table with a top that lifts up, providing hidden storage for blankets and remotes, and converting into a high surface for working or eating on the sofa.
Vertical Drawers: Use tall, narrow dressers and étagères (tall open shelves) instead of short, wide ones. Draw the eye up to the ceiling (making the space feel taller) while capitalizing on vertical storage space. (Internal Link: Link to the ‘Curtains for Low Ceilings’ post on drawing the eye upward.)
Step 4: Maximizing Light and Flow
Even the perfect layout will feel bad if the space is dark and cluttered.
The Mirror Placement Strategy
The Method: Place large mirrors on the walls directly opposite windows, or perpendicular to the main light source.
The Benefit: The mirrors reflect natural light and the view, visually doubling the size of the room and improving flow.
Internal Link: [Anchor text: “tips for hanging art” to the Home Decor post on gallery wall math, ensuring mirrors are hung at the right height].
Maintaining Clear Pathways
The Rule: You must have a clear pathway of at least 3 feet wide between all major functional zones (bed to kitchen, sofa to front door).
The Effect: This ensures the layout is physically easy to navigate, which makes the whole studio feel less cluttered and more spacious.
4. FAQ Section (Ready for Schema Markup)
Q: Where is the best place to put the bed in a studio?
A: The bed should be placed in the corner furthest from the entry door and the kitchen/main activity area. This maximizes privacy and minimizes visual distraction. Use a screen or bookshelf to block the line of sight from the front door to the bed.
Q: Should I use a full-sized sofa or a loveseat?
A: If your ceiling height is average or above (9 feet+), you can use a regular-sized sofa. If ceilings are low (8 feet or less), a well-chosen loveseat or settee can look less overwhelming. Always choose a sofa with clean lines and exposed legs (to let light pass underneath) to keep the space visually light.
Q: Can I use large pieces of art in a small studio?
A: Yes, a single large piece of art (one focal point) is far better than many small pieces. A large piece creates depth and prevents the walls from looking too busy, which happens when cluttering the walls with too many small items.
Q: What is the biggest layout mistake in a studio?
A: Pushing all the furniture against the walls. This creates a large, unused void in the center and highlights the small square dimensions of the room. Floating the sofa and using the back of the furniture for separation is key.
Q: Should the TV be visible from both the sofa and the bed?
A: Ideally, no. This usually means the bed is too integrated into the living area. If possible, keep the TV centered on the Living Zone, or use a TV on a swiveling mount that can face either area when needed, but only by choice.
Q: How do I create a home office space in a studio?
A: Use the corner furthest from your bed/sofa. Use a floating desk shelf or a narrow desk, and define the area with a small, unique accent rug or a standing screen. Ensure your office chair can tuck completely under the desk when not in use.