Introduction
Remove Mineral Deposits from your bathroom with ease—even after you’ve cleaned everything else, that stubborn white, crusty buildup around your faucet and showerhead can still ruin the look. That chalky residue is limescale, or mineral deposits—the hard water minerals (calcium and magnesium) left behind when water evaporates. Limescale can make new fixtures look old, restrict water flow, and is notoriously difficult to scrub away. After years of testing harsh commercial descalers, I discovered a surprisingly simple, non-toxic, and incredibly effective hack using one common pantry item. I promise this method is the easiest way to remove mineral deposits from faucets—you simply set it up and walk away. Get ready to restore the brilliant, smooth shine to your kitchen and bathroom fixtures effortlessly.
1. Remove Mineral Deposits
Understanding the White Crust: What is Limescale?
Limescale is not soap scum or dirt. It is a stubborn, hard deposit of calcium carbonate ($CaCO_3$) and magnesium carbonate.
Why Limescale is So Hard to Clean
Chemical Bonds: These mineral bonds are highly resistant to physical scrubbing and neutral detergents. They require a weak acid to dissolve the bonds, changing the hard carbonate structure back into a water-soluble form that can be rinsed away.
The Location Problem: Limescale often builds up in awkward crevices, like the base of the faucet or inside the small holes of the aerator/showerhead, where a scrub brush can’t reach.
E-E-A-T Insight: Because scrubbing can scratch chrome finishes, the best method for removing limescale is always chemical dissolution (using a safe acid), not physical abrasion.
The Easiest Way: The Overnight Vinegar Bag Hack
This brilliant, hands-off method uses a common household item to deliver the necessary acid directly and continuously to the problem area.
Supplies Needed
| Ingredient | Role in the Solution | Amount |
| White Distilled Vinegar | The weak acid needed to dissolve the carbonate bonds. | Enough to fill a bag |
| Small Ziploc Bag/Sandwich Bag | The vessel to create the focused soak environment. | 1 per faucet |
| Rubber Band or Twist Tie | Secures the bag in place. | 1 per faucet |
| Soft Cloth | For final polishing. | 1 |
Step-by-Step for Faucet Spouts (H3)
Fill the Bag: Pour enough white distilled vinegar into the Ziploc bag to fully submerge the spout of the faucet.
Submerge and Secure: Carefully position the bag so the spout is fully immersed in the vinegar. Use the rubber band or twist tie to secure the bag tightly around the faucet neck, ensuring the vinegar stays contained.
The Wait: Let it soak overnight (6–10 hours). This extended, concentrated contact time allows the acetic acid to completely dissolve the tough mineral deposits.
The Reveal: Remove the bag, discard the vinegar, and rinse the faucet with clean water. The softened mineral deposits should easily wipe away with a soft cloth.
The Showerhead Adaptation
Small Heads: Follow the same bag method for smaller showerheads.
Large Heads: If you can’t easily bag it, run the showerhead under hot water for a few minutes, then wrap the entire head tightly in a towel soaked in hot vinegar. Secure the towel with a strong rubber band. Let it sit for several hours.
Descaling Precision: The Aerator and Base
Often, the worst buildup is in the two hardest-to-reach spots: the aerator (the mesh screen at the tip) and the faucet base.
Cleaning the Aerator (Internal Water Flow) (H3)
Problem: Limescale inside the aerator restricts water flow, causing sputtering.
Solution: Use a small wrench or pliers to carefully unscrew the aerator. Disassemble the small screen components. Soak these tiny parts in a small cup of full-strength vinegar for 30 minutes. Scrub any remaining residue with an old toothbrush, rinse thoroughly, and reassemble.
The Faucet Base and Handle
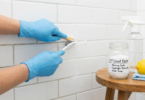
Problem: White crust forms where water drips onto the base plate.
Solution: Instead of a bag, soak paper towels in vinegar and wrap them tightly around the base and handles. Leave the towels there for 2–3 hours. The wet paper towel delivers the acid precisely where the scrubbing pad can’t reach.
Practical Tip: Use an old dental pick or wooden skewer to gently scrape the softened limescale from the tiny grooves where the handle meets the base.
Prevention is Key: Stopping Limescale Recurrence
Once you’ve successfully removed the deposits, keep them from coming back.
Wipe Dry Policy: After every use (especially in the shower), quickly wipe down the chrome/stainless steel fixtures with a dry towel. If the water doesn’t evaporate, the minerals won’t deposit.
Regular Maintenance Spray: Keep a 50/50 mix of water and vinegar in a dedicated spray bottle nearby. Once a week, give the faucets a light mist and a quick wipe down. This prevents small deposits from hardening. (Internal Link Opportunity: Link to a post in ‘Cleaning Hacks’ about safe disinfection practices.)
Switch to a Softener: If your home has severe hard water issues, consider installing a whole-house water softening system. This is a large investment but eliminates the root cause of limescale deposits entirely. (Internal Link Opportunity: Link to a ‘Smart Living’ post about smart home gadgets for water quality).
4. FAQ Section (Ready for Schema Markup)
Q: Can I use lemon juice instead of vinegar to remove limescale?
A: Yes, lemon juice (citric acid) is also effective at dissolving limescale, as it is a weak acid like vinegar. However, vinegar is generally cheaper and has a slightly higher acid content (around 5% acetic acid vs. 3-4% citric acid), making it the more cost-effective and powerful solution for large deposits.
Q: Is the vinegar bag hack safe for all faucet finishes?
A: The vinegar bag hack is safe for chrome, stainless steel, and most brass finishes. However, avoid using this method on gold-plated, matte black, or oil-rubbed bronze finishes, as prolonged exposure to acid can potentially etch the delicate finish. For those, use the vinegar-soaked paper towel method for less than an hour.
Q: How often should I clean the faucet aerator?
A: You should visually inspect or clean your aerator every 3 to 6 months. If you notice the water stream becoming erratic, sputtering, or weak, it’s a clear sign the aerator is clogged with mineral deposits and needs immediate attention.
Q: Can I use baking soda on the limescale?
A: Baking soda is an alkali and will neutralize the acid, which is not what you want when dissolving limescale. However, you can use baking soda after the vinegar soak to polish the faucet, as its gentle abrasive quality can remove any lingering residue without scratching the finish.
Q: I have black mold on my faucet base. Will vinegar remove it?
A: Vinegar is excellent for killing and inhibiting mold growth, which often thrives in the damp seal between the faucet base and the counter. Clean the area with the vinegar-soaked paper towels (to dissolve minerals) followed by a final spray of hydrogen peroxide to sanitize the remaining mold spores.
Q: What if I don’t have a small Ziploc bag?
A: A strong plastic shopping bag (with no holes) secured tightly with tape or multiple rubber bands will work. Alternatively, you can fill a durable plastic cup with vinegar and tape it securely under the spout, ensuring the cup stays flush and upright.